We will create a
StickyElement component that will enhance any other component with a very cool sticky microinteractionHover me!
This tutorial uses Nuxt as a web metaframework. However the code can be easily adapted to your preferred web framework.
Installing the required dependencies
To begin with, we need to install some deps. Specifically we are going to use motion-v to handle the cool animation.
Install the dependency with your package manager:
pnpm add motion-v
yarn add motion-v
npm install motion-v
bun add motion-v
Add it to your modules in your configuration:
nuxt.config.ts
export default defineNuxtConfig({
  modules: ["motion-v/nuxt"]
})
And now you are good to go.
Creating the component
To start with, create a new component called StickyElement inside your components folder. We will use this component to give any other component our cool sticky microinteraction.
Setting up the callbacks
The template section is going to be fairly easy, we are going to simply use a motion.div:
sticky_element.vue
<template>
    <motion.div
        ref="elementRef"
        class="w-fit h-fit" :style="{ x, y }"
        @hover-start="handlePointerEnter"
        @hover-end="handlePointerLeave">
        <slot></slot>
    </motion.div>
</template>

<script lang="ts" setup>
// Import all the required stuff
import { frame, motion, type SpringOptions, useSpring } from "motion-v";
</script>
We are going to define the two functions handlePointerEnter and handlePointerLeave that we will use to set some defaults and track the dragging state. Define a boolean ref, update it in the two functions and add also a reference to our element:
sticky_element.vue
<script lang="ts" setup>
import { frame, motion, type SpringOptions, useSpring } from "motion-v";
const dragging = ref<boolean>(false);
const elementRef = useTemplateRef("elementRef");

function handlePointerEnter() {
    dragging.value = true;
}

function handlePointerLeave() {
    dragging.value = false;
}
</script>
Now, whenever the mouse moves, we will need to check whether we are currently dragging the element and update the position accordingly. To do this we can hook into the mounted events and register our handlePointerMove handler:
sticky_element.vue
function handlePointerMove(ev: PointerEvent) {
    // We will handle sticky position logic here
}

onMounted(() => {
    window.addEventListener("pointermove", handlePointerMove);
});

onUnmounted(() => {
    // Clean listeners so we do not have s**t hanging around!
    window.removeEventListener("pointermove", handlePointerMove);
});
Now let's start implementing the actual stickyness logic.
Implementing the logic
We are going to use two springs as animations in the two axis x and y.
With motion, we can use the useSpring composable:
sticky_element.vue
// Define some props to customize the behaviour
const props = withDefaults(defineProps<{ amplitude?: number; spring?: SpringOptions }>(), {
    amplitude: 10,
    spring: () => <SpringOptions>{ damping: 50, stiffness: 2000 },
});

const y = useSpring(0, props.spring);
const x = useSpring(0, props.spring);
Before we forget, whenever we stop dragging, let's reset the springs values:
sticky_element.vue
function handlePointerLeave() {
    x.set(0);
    y.set(0);
    dragging.value = false;
}
Now, inside the handlePointerMove function, we are going to implement the following logic:
sticky_element.vue
function handlePointerMove(ev: PointerEvent) {
    if (!dragging.value) return;
    // To access the actual element reference of a motion.div we need to access the $el property
    const el = elementRef.value?.$el;
    if (!el) return;
    const rect = (el as HTMLElement).getBoundingClientRect();
    frame.read(() => {
        const targetX = ev.clientX - (rect.left + rect.width / 2);
        const targetY = ev.clientY - (rect.top + rect.height / 2);
        const restX = targetX;
        const restY = targetY;
        x.set(restX);
        y.set(restY);
    });
}
Inside the frame.read callback we are simply computing the vector pointing the mouse cursor starting from the center of the element. Then we are simply setting the spring target x and y.
However you are going to see there is a slight problem: the element kind of weirdly jumps around when we move the mouse.
Fixing our movement with math
This problem happens because each frame, we are updating the vector difference between the current position of the element and the mouse cursor, and since the element is moving itself, it just gets weird.
To fix this, we can use a mathematical function that, given a value, it will smoothly remap it to a smaller one. The perfect candidate is the . We are going to tweak it a little bit in such a way that it satisfies our requirements.
- We do not want to deal with infinite values so we move it on the
- We want it to be symmetrical with respect to the axis, so let's use the power of 2
- The classical is too "harsh" therefore we also multiply the by a constant value to reduce how steep it is (remember we are dealing with pixels)
- Finally we want to be able to adjust the amplitude, therefore we multiply by a constant .
The final result is the following:
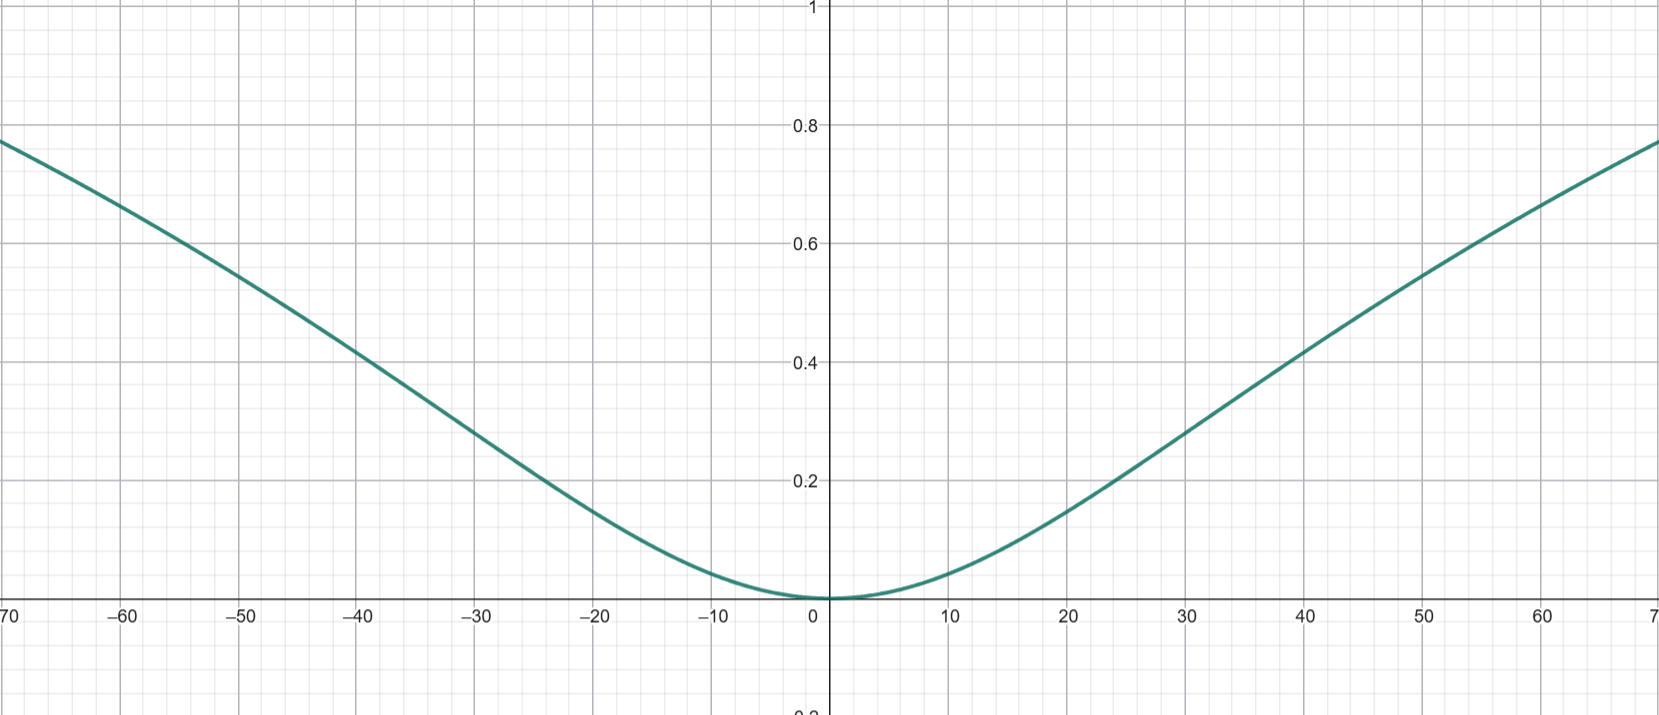
To play around with mathematics you can use online graphical calculators such as Geogebra.
Let us translate this function to code and add it to our handlePointerMove handler:
sticky_element.vue
function asymptoteFun(val: number) {
    return props.amplitude * Math.sign(val) * Math.log(1e-3 * val * val + 1);
}

function handlePointerMove(ev: PointerEvent) {
    if (!dragging.value) return;
    const el = elementRef.value?.$el;
    if (!el) return;
    const rect = (el as HTMLElement).getBoundingClientRect();
    frame.read(() => {
        const targetX = ev.clientX - (rect.left + rect.width / 2);
        const targetY = ev.clientY - (rect.top + rect.height / 2);
        const restX = asymptoteFun(targetX);
        const restY = asymptoteFun(targetY);
        x.set(restX);
        y.set(restY);
    });
}
There is one last thing, as you can notice, inside our asymptoteFun, we multiplied by the sign of our value. This is because we do want the function to be symmetrical, but of course we want the element to move in the same direction as the mouse.
The final code
Putting everything togheter, you now have a very cool component that can be used to enhance any other component with a smooth microinteraction.
Be sure to give a star to my free Nuxt template for other very cool components and implemented features.
Here is the final code, cheers!
sticky_element.vue
<template>
    <motion.div
        ref="elementRef"
        class="w-fit h-fit"
        :style="{ x, y }" @hover-start="handlePointerEnter" @hover-end="handlePointerLeave">
        <slot></slot>
    </motion.div>
</template>

<script setup lang="ts">
import { frame, motion, type SpringOptions, useSpring } from "motion-v";

const props = withDefaults(defineProps<{ amplitude?: number; spring?: SpringOptions }>(), {
    amplitude: 10,
    spring: () => <SpringOptions>{ damping: 50, stiffness: 2000 },
});

const elementRef = useTemplateRef("elementRef");
const dragging = ref(false);
const y = useSpring(0, props.spring);
const x = useSpring(0, props.spring);

function asymptoteFun(val: number) {
    return props.amplitude * Math.sign(val) * Math.log(1e-3 * val * val + 1);
}

function handlePointerMove(ev: PointerEvent) {
    if (!dragging.value) return;
    const el = elementRef.value?.$el;
    if (!el) return;
    const rect = (el as HTMLElement).getBoundingClientRect();
    frame.read(() => {
        const targetX = ev.clientX - (rect.left + rect.width / 2);
        const targetY = ev.clientY - (rect.top + rect.height / 2);
        const restX = asymptoteFun(targetX);
        const restY = asymptoteFun(targetY);
        x.set(restX);
        y.set(restY);
    });
}

onMounted(() => {
    window.addEventListener("pointermove", handlePointerMove);
});

onUnmounted(() => {
    window.removeEventListener("pointermove", handlePointerMove);
});

function handlePointerEnter() {
    dragging.value = true;
}

function handlePointerLeave() {
    x.set(0);
    y.set(0);
    dragging.value = false;
}
</script>

<style></style>